I was doing some spring cleaning this week. Yes, my spring cleaning gets delayed until October. When I decided that it was time to clean some of my silver jewelry. The method that I enjoy using was once known as "stripping" some people do a version of this with vinegar as well, but the method that I love only involves aluminum foil, water and baking soda. When aluminum foil and baking soda touch the tarnish will fall to the bottom of the pan leaving your jewelry as shiny as the day you bought it. This method also works with silverware, however, some do not like to use this method because it cleans off all of the grout in the crevices removing some of the “antiqued” look of the silver. 

  1. Line a glass pan with aluminum foil 
  2. Place your jewelry and the bottom of the pan
  3. Pour four cups of boiling water into the pan
  4. Add 1/2 a cup of baking soda
  5. Leave the jewelry in the pan for a few minutes 
  6. Wipe off the jewelry with a cloth towel
Here are some before and after photos of a piece of jewelry that I was working with this weekend. I was hoping to get more photos, but I forgot the “before” photos for the rest of the project. I hope that this project is able to make your life a little simpler and cheaper! I have found over the years that cleaners are nowhere near as cheap of effective as this method. Happy cleaning everyone!


                                                                                Before:


After:


Pumpkin Spice Latte Recipe
I have a confession to make...I have an extreme weakness for Pumpkin Spice Lattes, however with that being said I hate paying the price that comes along with that delicious Starbucks cup. Over the years, my family and I have tried various recipes, but this would definitely be our favorite. There is just something about it that makes it only acceptable during the fall and winter seasons, but I look forward to this warm cup in my hand year after year. It always reminds me of pumpkin patches, scarves and the company of some of our wonderful friends. This is enough to make one cup, but you can easily convert it for a larger batch.  We have even made this and put the finished product in a large crockpot with a ladle for our company to put whatever they want in their glass! I hope that this recipe makes your fall a little better.
INGREDIENTS
1 cups milk (dairy or non-dairy)
2 tablespoons pumpkin puree
1 to 2 tablespoons sugar, depending on how sweet you like it
1/2 teaspoons vanilla extract
1/2 teaspoon pumpkin pie spice, plus more for serving
1/4 cup strong hot coffee
Whipped cream, for serving
DIRECTIONS
Add milk, pumpkin puree, and sugar to a saucepan over medium heat. Heat until hot, but do not boil. Remove the saucepan from the heat and whisk in the vanilla, pumpkin pie spice, and the coffee.
 Top with whipped cream and a sprinkle of pumpkin pie spice.


Weeknight Korean Beef Recipe 

My husband and I LOVE to make Asian food. Anything that contains sesame seed oil we get excited about. The only problem is that Asian food can be an extremely lengthy process. When we first tried this Korean beef recipe we were in love! It has a great flavor and is a wonderful way to make ground beef into something delicious!!! The only ingredient that you may not have is the sesame seed oil. It is a cheap ingredient (about four dollars at our local grocers), but it lasts forever. This recipe is by no means authentic, but the original is much more time consuming and costly. This is a great cheater recipe that can give you a korean beef feel on a busy night.

Korean Beef and Rice
Ingredients:

¼ cup packed brown sugar
¼ cup reduced sodium soy sauce
2 teaspoons sesame oil
¼ teaspoon ginger
1 Tablespoon vegetable oil
3 cloves minced garlic
1 pound ground beef
2 green onions

First off, take the vegetable oil and place it in a plan over medium heat. Add the garlic and cook for about a minute until the garlic is fragrant.


Secondly, add the ground beef to the garlic and oil. Cook the meat until completely brown about 3-5 minutes. Take the pan off the heat.


Next, in a small bowl combine the brown sugar, soy sauce, sesame oil, and ginger. Mix until the brown sugar has been incorporated. 


Place the pan with the meat back on the stove over medium heat and add the brown sugar mixture.


Lastly take the green onions and mix into the beef.


Take the pan off of the stove and serve over rice!


Basic College Cooking 101


I recognize that most college students especially those who are living on their own for the first time. I decided to make a post with some very basic cooking knowledge for those who have never had to deal with this cooking thing before!  I asked various college students what information that they would find most useful and I was surprised with the response. Today were going to start on the simplest thing that you will learn in your time in the kitchen. How to boil an egg! These cooking 101 posts should only occur on the blog once every 3-4 weeks, however, they are very important posts for beginning cooks!

 Boiling an egg

1.       Put the eggs in a pan of cool water and then fill it with cold water (leaves some room for bubbles).
2.       Bring to a roiling boil
3.       Turn off the heat and cover the pan
4.       Leave eggs in water for the desired cooking time drain the hot water, set aside, and then fill with cool water
Boiling an egg cooking times:
6 minutes if you want the yoke to be a little gushy
10 minutes if you want the yoke to be soft
16 minutes if you want a traditional hardboiled egg
There’s nothing that a weekend at grandmas can’t fix.  My husband is currently out of the state for the next few days. If you know my husband and I you know that while we were extremely happy in our independence before marriage we both get slightly grumpy when we can’t hang out with each other throughout the week now that there’s a ring on both of our fingers.

So, while my amazing husband is in New Jersey, my mother and sister decided to come up to Nebraska to visit my aunts, my grandmother and I. It is always an amazing time. All four of us women have extremely different personalities my sister is quiet and more reserved than most, however, she has a light-hearted sense of humor that can light up a room like none other, my mother is the glue that keeps us all together, and I have a sarcastic sense of humor, I tend to be more serious and thrive on structure and appointments. Somewhere in the fun of the day I found myself getting overwhelmed. A trip to the store wound up becoming a trip to chiropractor as well as a trip to the store, which lead to a trip to the garage sales that were and since the trip was taking a little while its required a few restrooms stops on the way. We don’t typically agree with one another on much, but we are family.


However, there is one thing that we can all agree on, apple pie. I tend to like the crust the best (my weakness for carbs is a strong one) , my sister likes the filling, and my mother appreciates the delicacy of each element. It’s a beautiful thing, isn’t it? That we weren’t all created with the same passions and desires. I will never see eye to eye with each member of my family, it’s simply not going to happen, however, I can respect each person for the way that they are uniquely created.  The best thing about family is that you don’t have to get along 100% of the time to truly love one another. You don’t have to love the garage sales or the restroom stops to love the apple pie and conversation at the end of the night. That's what makes family the greatest!

Here's a recipe that my sister and I use:


Ingredients

  • 1/2 cup sugar
  • 1/2 cup packed brown sugar
  • 3 tablespoons all-purpose flour
  • 1 teaspoon ground cinnamon
  • 1/4 teaspoon ground ginger
  • 1/4 teaspoon ground nutmeg
  • 6 to 7 cups thinly sliced peeled tart apples
  • 1 tablespoon lemon juice
  • Pastry for double-crust pie (9 inches)
  • 1 tablespoon butter
  • 1 large egg white
  • Additional sugar


   Directions

  1. In a small bowl, combine the sugars, flour and spices; set aside. In a large bowl, toss apples with lemon juice. Add sugar mixture; toss to coat.
  2. Line a 9-in. pie plate with bottom crust; trim pastry even with edge. Fill with apple mixture; dot with butter. Roll out remaining pastry to fit top of pie. Place over filling. Trim, seal and flute edges. Cut slits in pastry.
  3. Beat egg white until foamy; brush over pastry. Sprinkle with sugar. Cover edges loosely with foil.
  4. Bake at 375° for 25 minutes. Remove foil and bake 20-25 minutes longer or until crust is golden brown and filling is bubbly. Cool on a wire rack. Yield: 8 servings.

Often I find myself having to look for a quick reference for cooking conversions. I hope this helps everyone as much as it does me! I currently have this hanging in my kitchen cabinet.

US Dry Volume Measurements
MEASUREEQUIVALENT
1/16 teaspoondash
1/8 teaspoona pinch
3 teaspoons1 Tablespoon
1/8 cup2 tablespoons (= 1 standard coffee scoop)
1/4 cup4 Tablespoons
1/3 cup5 Tablespoons plus 1 teaspoon
1/2 cup8 Tablespoons
3/4 cup12 Tablespoons
1 cup16 Tablespoons
1 Pound16 ounces
US liquid volume measurements
8 Fluid ounces1 Cup
1 Pint2 Cups (= 16 fluid ounces)
1 Quart2 Pints (= 4 cups)
1 Gallon4 Quarts (= 16 cups)
US to Metric Conversions
1/5 teaspoon1 ml (ml stands for milliliter, one thousandth of a liter)
1 teaspoon5 ml
1 tablespoon15 ml
1 fluid oz.30 ml
1/5 cup50 ml
1 cup240 ml
2 cups (1 pint)470 ml
4 cups (1 quart).95 liter
4 quarts (1 gal.)3.8 liters
1 oz.28 grams
1 pound454 grams
Metric to US Conversions
1 milliliter1/5 teaspoon
5 ml1 teaspoon
15 ml1 tablespoon
30 ml1 fluid oz.
100 ml3.4 fluid oz.
240 ml1 cup
1 liter34 fluid oz.
1 liter4.2 cups
1 liter2.1 pints
1 liter1.06 quarts
1 liter.26 gallon
1 gram.035 ounce
100 grams3.5 ounces
500 grams1.10 pounds
1 kilogram2.205 pounds
1 kilogram35 oz.
Pan Size Equivalents
9-by-13-inches baking dish22-by-33-centimeter baking dish
8-by-8-inches baking dish20-by-20-centimeter baking dish
9-by-5-inches loaf pan23-by-12-centimeter loaf pan (=8 cups or 2 liters in capacity)
10-inch tart or cake pan25-centimeter tart or cake pan
9-inch cake pan22-centimeter cake pan

Oven Temperature Conversions

FarenheitCelsiusGas Mark
275º F140º Cgas mark 1-cool
300º F150º Cgas mark 2
325º F165º Cgas mark 3-very moderate
350º F180º Cgas mark 4-moderate
375º F190º Cgas mark 5
400º F200º Cgas mark 6-moderately hot
425º F220º Cgas mark 7- hot
450º F230º Cgas mark 9
475º F240º Cgas mark 10- very hot

Ratios for selected foods

MeasureEquivalents
Butter
1 T.
1 stick
14 grams
4 ounces=113 grams
1 Tablespoon
8 tablespoons
½ cup
4 sticks16 ounces=452 grams32 tablespoons2 cups
Lemon
1 lemon1 to 3 tablespoons juice, 1 to 1½ teaspoons grated zest
4 large lemons1 cup juice¼ cup grated zest
Chocolate
1 ounce¼ cup grated 40 grams
6 ounces chips1 cup chips 160 grams
cocoa powder1 cup 115 grams
Creams
Half and half½ milk ½ cream10.5 to 18 % butterfat
Light cream18 % butterfat
Light whipping cream26-30 % butterfat
Heavy creamwhipping cream36 % or more butterfat
Double creamextra-thick double cream,
Clotted or Devonshire
42 % butterfat

Measures for Pans and Dishes

InchesCentimeters
9-by-13-inches baking dish22-by-33-centimeter baking dish
8-by-8-inches baking dish20-by-20-centimeter baking dish
9-by-5-inches loaf pan (8 cups in capacity)23-by-12-centimeter loaf pan (2 liters in capacity)
10-inch tart or cake pan25-centimeter tart or cake pan
9-inch cake pan22-centimeter cake pan

As a 21 year old newlywed I was absolutely DESPERATE for recipes that turned out delicious every time that I would prepare them. I am a sucker for anything to do with enchiladas so after I tried this recipe I was hooked. The goal of my blog is to help those who are transitioning from college life into the working world with making everyday tasks seem a little less intimidating. With this is mind I wrote the recipes step by step with photos attached so that you can follow along with no fear! I hope that you enjoy this recipe as much as my husband and I. It is by no means a diet recipe, but perfect for a date night in. You can find the full recipe and ingredient list at the bottom of the page. 

Shrimp and Spinach  Date Night Enchiladas

Preheat the oven to 375. Dice the red peppers.


Next the onion.


Heat up the olive oil over medium heat and then sautee the red peppers and onion until soft.This should take  around 2 1/2 minutes.


Next, add the shrimp and cook for about 2 minutes until it is just slightly pink as pictured. The shrimp will be cooked more once it is put in the oven.


Now, add the spinach and cilantro. You will need to sautee until the spinach wilts about 1-2 minutes. After Spinach is wilted set aside, if there is excessive liquid drain when necessary.


Now lets start the sauce. First melt the butter in the skillet over medium heat.


Then we quickly whisk the flour to make a rue.


Actively whisk the mixture, keep the rue on medium heat for about a minute. There is no need to worry it is supposed to look like play-dough at this stage.


Slowly add the chicken broth and continue to cook over medium high heat stirring constantly. The mixture will start out thin and thicken up during the cooking process . Once the mixture has thickened lower the heat and add the Pepper Jack cheese and stir until melted. Remove the mixture from the heat and add the salsa and sour cream.


Now, place some of the sauce at the bottom of your baking dish. This will keep the enchiladas from burning on the pan.

\

Fill a tortilla with 3/8 cup (1 1/2 of a fourth cup scooper) of the shrimp mixture, roll the tortilla and place it with the open side down in the baking dish. Repeat until there is no shrimpy goodness left.


Make sure they are lying tightly in the baking dish.


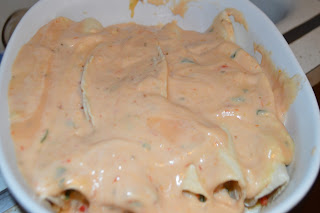
Pour the sauce over the tortillas and bake uncovered for 30-40 minutes or until heated through


Finally, we have our creamy enchiladas complete!!


Ingredients:
8 (6-inch) flour tortillas

Shrimp Filling:
2 butter
½ cup red bell pepper, diced 
½ cup white onion, diced 
2 cloves garlic
1 pound shrimp, peeled and deveined and chopped into 1 inch pieces
1 1/2 teaspoon chili powder or Cajun seasoning 
1/8 of a cup cilantro
2 cups Chopped Spinach
2 tablespoons lime juice

Sauce:
2 tablespoons butter
4 tablespoons flour
1½ cups chicken broth
½ cup favorite salsa or salsa verde
1½ cups shredded Pepper Jack (or for a less spicy version Monterey Jack Pepper Jack is Monterey Jack with a little stronger jalapeno kick) 
1 cup sour cream

Directions:


  1. Preheat Oven to 350 degrees 
  2. Start with the Shrimp filling: In a large skillet heat up the olive oil. Sautee the red bell pepper and onion until slightly soft. Add the garlic and cook for an additional minute and a half
  3. Add the shrimp and cook for about 3 minutes. The shrimp will be cooked more once it is put in the oven.
  4. Remove mixture from the heat and add the salt, chili powder, cilantro, and lime. Stir and set aside.
  5. For the Sauce: In a large skillet melt the butter. Add the flour and stir and cook for 1-2 minutes. Slowly add the chicken broth and continue to cook over medium high heat stirring constantly. The mixture will start out thin and thicken up once it cooks.
  6. Once the mixture has thickened lower the heat and add the Pepper Jack cheese and stir until melted. Remove the mixture from the heat and add the salsa and sour cream.
  7. Add enough sauce to the reserved shrimp mixture to lightly cover.
  8. Fill a tortilla with ⅓ cup of the shrimp mixture, roll the tortilla and place it with the open side down in the baking dish. Repeat until there is no longer any filling.
  9. Pour the sauce over the tortillas and bake uncovered for 30-40 minutes or until heated through
Powered by Blogger.

Popular Posts